

The 9 Best Exercises For Back Pain
As many as 8 out of 10 Americans suffer from back pain at some point in their life.
One of the most common approaches to dealing with back pain is to take a pill, but this only masks the problem. It doesn't deal with the cause of back pain.
Another approach is to be proactive in maintaining a healthy back.
To lower your chances of getting back pain, the right kind of movement can go a long way.
Below I have an example exercise protocol for preventing back pain.

Example Back Pain Prevention Protocol
A1: Down Dog - Cobra
Start in Down Dog - hands and feet on the ground, lock your knees, engage your hip flexors and push the ground away with your hands. Ideally your hips, shoulders and hands will form a straight line.
If you're super tight, you might find that your feet are a long way from you're hands, if you're bendy, you might be able to squeeze your toes into your wrists.
Wherever you're at right now is perfect!
From here tuck your pelvis and roll your spine into an arch position with your butt engaged, belly button drawn into your spine and chest lifted toward the ceiling. Your shoulders should push strongly toward the ground.
Now reverse the movement and find your way back to Down Dog.
Alternate exercise: Cat-Cow
A2: Patrick Split Squat 3 x 10-15
The 'Patrick' version of the split squat (named after Ben Patrick aka @kneesovertoesguy) is a great way to develop range in the knee joint as well as to open up the hip flexors.
The easiest version of the exercise elevates the front foot on a box or a step, in a lunge position.
You'll keep your hips square as you pull your weight into the front foot. Toward the end of the movement, you may need to let your heel lift off the floor.
The goal is to sit your butt on your heel, while your back knee remains as straight as possible.
Try not to lean forward as you do the movement.
A3: Side Squat 3 x 8-10 each side
Side squat are a fantastic way to get your adductors long and strong.
Start standing with your feet in double shoulder width position, then squat down to one side, while keeping your other leg straight.
When I first did this exercise, I had to hold onto the ground to make sure I wouldn't fall over!
Ideally your torso will remain fairly upright throughout the movement.
You'll need to engage your hip flexors, hamstrings and butt muscles during this exercise.
If you're up for the challenge you can add weight, although, in the initial stages I find this unnecessary - just focus on engaging the muscles and only work through pain free range of motion.
B1: Thoracic Self Myofascial Release
This one can be done with a Rumble Roller, but I find it far more satisfying to use The Stick
.
Lay on the ground face up. Place The Stick so that the pressure is on the interesting spots along the part of your spine between your shoulder blades.
Let your tissue sink in around The Stick.
Apply torque by gently lifting the handle of The Stick toward your ear and then breathe deep. can be opened up with VERY deep breathing.
As you breathe in, the vertebrae will naturally open into extension, and as you breath out, they will go into flexion. This movement can be enough to help free up any fixations with the ribs.
B2: Hip Flexor Self Myofascial Release
Start laying on your back with knees bent and a kettlebell within reach.
Carefully place an appropriately weighted kettlebell on the inside of one of your hip bones. Let it sink in with your breath.
Reach your leg out to laying flat then slide it back to bent again. You'll need to repeat a few times.
B3: Adductor Self Myofascial Release
Start this release laying on your side, with your thigh laying over a Rumble Roller with one end propped up on a foam block.
This will do 2 things: 1. raise the roller to a more appropriate height, 2. Create an angle, so that your thigh tends to slide down the roller.
This in turn will 'peel' the adductor tissue from anything it is 'glued' to.
You may need to adjust your position several times to hit all the angles of the adductors.
C1: Camel/ Kneeling Situp 3 x 8-10
Start in a kneeling position, draw your belly button toward your spine, squeeze your butt and lift your chest toward the ceiling.
Reach back toward your heels, keeping your hips as far forward as you can.
Your first goal is to be able to touch your hands to your heels and come back out of this position (Camel pose).
If you want to push to the next level, try reaching your head to the floor. If you need an in between variation, place a bench (with padding) behind you and reach your head for that.
C2: 90 90 Good Morning 3 x 8-10
Start on a bench in 90 90 position. Pull your thigh into your hip socket, and your belly in toward your spine, then fold forward toward your foot.
Squeeze your butt to push back up to vertical.
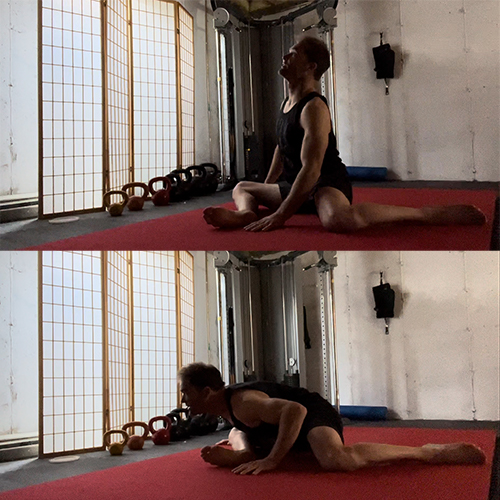
For a more advanced version, do the same thing, but on the floor, with your back leg straight and hips square (Pigeon Good Morning)
In the top position, squeeze the butt of the back leg and arch backward.
C3: Long Lunge 3 x 30-60
Stand in a split stance, with your feet shoulder width apart as far apart as you can with your hips square to the front.
Lower down a couple of inches, and pulse back up again. If you can lower more than a couple of inches, then your legs are too close together!

© 2024 Gentle Myofascial Release. All rights reserved.